Fluid Brush Tool Guide
The Fluid Brush Tool allows you to interactively paint or erase fluid particles directly in the editor viewport. This is useful for:
- Manually placing particles in specific areas
- Sculpting initial fluid shapes
- Removing unwanted particles from the simulation
Step 1: Select the Kawaii Fluid Volume
Click on the Kawaii Fluid Volume in your level to select it. The Details panel will show the "Brush Editor" category.
Step 2: Start Brush Mode
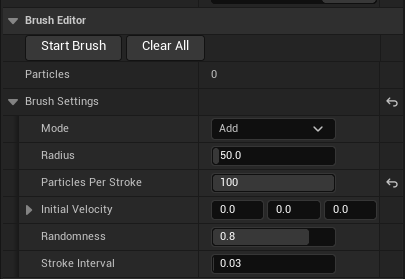
In the Details panel, find the Brush Editor category and click the "Start Brush" button.
Step 3: Configure Brush Settings
Expand the Brush Settings section to customize:
| Setting | Description | Range |
|---|---|---|
| Mode | Add - Paint new particles / Remove - Erase particles | Add, Remove |
| Radius | Size of the brush circle | 10 ~ 500 |
| Particles Per Stroke | Number of particles spawned per brush stroke | 1 ~ 100 |
| Initial Velocity | Starting velocity of spawned particles | Vector |
| Randomness | Random spread of particle positions | 0 ~ 1 |
| Stroke Interval | Time between brush strokes while holding click | 0.01 ~ 0.5 |
Step 4: Paint Particles
- Left-click and drag inside the Volume bounds to paint particles
- The brush preview circle shows the affected area
- Arrow indicates the spawn direction (surface normal)
Keyboard Shortcuts
| Key | Action |
|---|---|
| [ | Decrease brush size |
| ] | Increase brush size |
| 1 | Switch to Add mode (Green) |
| 2 | Switch to Remove mode (Red) |
| Alt + Left-click | Orbit camera (bypass brush) |
| ESC | Exit brush mode |
Step 5: Exit Brush Mode
Press ESC or click the "Stop Brush" button in the Details panel.
Tips
- The HUD displays current mode, radius, and particle count
- Brush only works within the Volume bounds
- When painting on static meshes inside the Volume, particles spawn on the surface
- When painting on Volume walls, particles spawn at the wall with appropriate spawn direction